Organic Canvas Book Bag Tutorial - by Meg Loven @LovenSews
All fabrics: Nature’s Fabrics
- ⅓ yd Navy Hemp Organic Cotton Canvas Fabric (305 gsm)
- ⅔ yd Navy and Natural Stripes Hemp Organic Cotton Canvas Fabric (220 gsm)
Features: Unlined tote bag with continuous wrap straps for super strong carrying capability. Optional tip for professionally finished French seam inside.


Bag Side - Stripes: Cut two 18” wide x 12” tall
Bag Base - Solid: Cut one 18” wide x 10” tall
Straps: Cut two 55” x 5”
Notions: ¼” Double Sided Tape (DST)
Notes: Tape marks the WRONG side of fabric. Seam allowance ⅜” unless otherwise noted.
Abbreviations: RST (Right sides together), WST (Wrong sides together)
 |
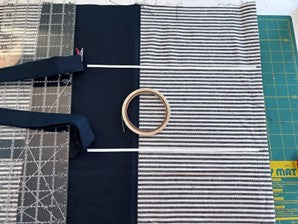
Step 1: Match the 18” edge of one bag side (stripes) with the 18” edge of the bag bottom (solid). For enclosed French seam, sew pieces WST. |
 |
Step 2: Iron seam flat, then bring the bag side and bag bottom together RST and stitch ⅜” from the edge, enclosing seam allowance. |
 |
Step 3: Fold seam allowance towards bag bottom and topstitch on the bag bottom at ⅛”. |
 |
Step 4: Repeat steps 1-3 to attach the other bag side to the bag bottom. |
 |
 |
 |
Step 5: Finish top edges of the bag sides by pressing ¼” along the top edge, then turning the pressed edge down and pressing at 1” to enclose edge. Stitch the top hem on the inside of the bag at ⅛” but start 4” from one edge and stop 4” from the other edge, leaving 4” unhemmed at both edges. (Do NOT stitch the entire top hem. This will be finished after the bag is stitched together to allow for nicer top hem.) Repeat for the 2nd bag side. |
 |
Step 6: Prepare the straps. Press the two long straps in half, then open and bring both edges to the center. Press again. Finish by pressing the strap in half again, so the finished folded strap has three creases and is 1 ¼” wide. |
 |
Step 7: Join the strap pieces to make one long strap. Place the strap pieces at 90 degrees from each other (RST) with the pressed lines open. Mark a line with chalk or a fabric pencil and pin. Sew along the diagonal line. |
 |
Step 8: Trim the triangle of extra fabric at ⅜” and press the seam open. Press the strap creases again to refresh the 1 ¼” strap. There should now be one long strap. |
 |
Step 9: Bring the ends together to create a continuous looped strap. Place the strap on top of the bag (don’t worry about exact placement now) and be sure there are no extra twists in the strap. Open the free ends of the strap and place at 90 degree angle as shown. Draw a diagonal line from one corner to the other as shown. |
 |
Step 10: Before stitching, pin and pull the strap down to be sure there are no twists in the strap. Stitch across the chalk line to join the strap in one continuous loop.
|
 |
Step 11a: The strap should now lay flat as a continuous loop on the bag. |
 |
Step 11b: Mark the center of the continuous loop strap with pins or clips. This center should be near the join seam. Place the marked points in the center of the bag bottom. Lay the strap on the bag bottom so that each strap is 5” from the edge. |
 |
Step 11c: Measure again at each end to be sure bag straps are straight. |
 |
Step 11d: Use DST or pins to secure the straps as placed on the bag. |
 |
Step 12: Beginning at the bag bottom, stitch ⅛” from the outer edge of the strap, continuing all the way around the strap back to the starting point. Repeat for the inner edge of the strap. The full strap should now be stitched to the bag. |
 |
Step 13: Fold the bag in half (RST) and match the hems at the top. Open the pressed hem ends flat and stitch or serge along both edges to close the bag. Consider pressing the seam allowance to one side and top stitching at ⅛” from the bag opening towards the bottom (stop at the bag bottom). This will prevent unraveling of the seam allowance. |
 |
Step 14: Press the hem again as in step 5 and stitch as in step 5 to close the hem across the side seams. |
 |
Step 15: Box the corners of the tote by measuring 1 ¼” from the bottom and the side seam. Be sure to measure from the SEAM at the side, not from the edge of the fabric. Mark with chalk or fabric pencil. |
 |
Step 16: Cut away the measured corners. |
 |
Step 17: Match the edges of the boxed corner by centering the seam and aligning the outer corners. |
 |
Step 18: Clip or pin boxed corner in place before stitching along edge. Turn bag right side out.
|


